

Home Studio Recording Mistakes You Might Be Making!
Andrea
If you really want to produce music in your own home recording studio but don't know where to begin!...
Hopefully, this guide is going to help you out!
Once you've got your home studio set up for recording with these 5 music production studio essentials, there's nothing to stop you!
You can begin creating music, and avoid the most common mistakes with home studio recording.
By knowing about these 10 common mistakes people tend to make when first starting out...
You won't make them yourself.
You can save time from the get-go!
Of course, making mistakes is all part of the learning curve towards achieving your goal.
And some errors are unavoidable - blunders are always part of the process - it's how we learn.
Once you've finished reading this article you will know about 10 common home studio recording mistakes that people often make.
And hopefully, it will instrument you in actually avoiding making these mistakes yourself!
It's always good to know what you're doing in advance right?
Instead of feeling unprepared, you're going to know exactly what to do if you encounter any of these oversights...
Here are 10 common home studio recording mistakes you need to check out to ensure that your home music recordings are at a decent level that can be acceptable to a music industry professional:
Recording at 16 bit
.
First of all, something to understand is that audio resolution is measured in 'bits'.
And nowadays we record at 24 bits.
The more bits, the greater the dynamic range of soft to loud sounds that your song can have.
When CDs were first introduced back in the 1980s, they were only 16-bit.
The 24-bit dynamic range gives the digital music more quality by allowing more headroom for peaks.
So there's less risk of 'clipping'.
And it also enables a greater separation between the recorded audio and the noise floor.
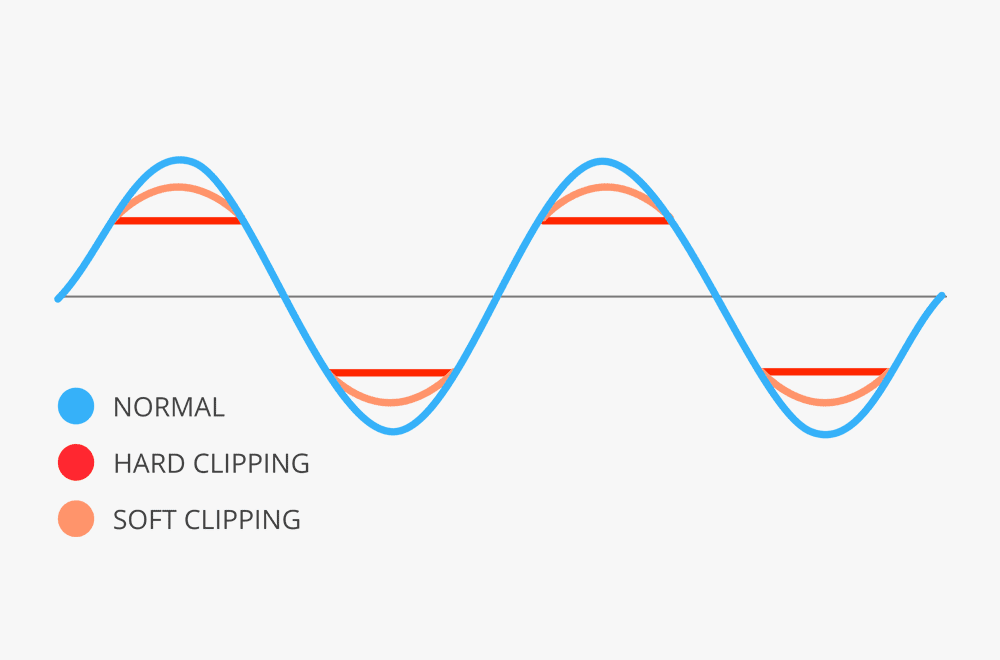
In the simplest sense, audio clipping is a form of waveform distortion.
MAX MCALLISTER - ProduceLikeAPro.com
Whilst producing an audio file in your home recording studio you will want all the headroom you can get!
Which is why 24bit beats 16!
More headroom means you can worry less about transient peaks causing clipping distortion.
And generally results in a better, more open and natural sound, so it's a good thing.
Use 24-bit audio and record at lower levels!
That way you don’t have to worry about putting your recording into the red...
Because that is something that can't be fixed later in the process.
.
.
Not considering the amount of 'room noise'
.
First and foremost, most home studio recording takes place in rooms that aren't exactly acoustically ideal.
And sound that might end up in your song isn't always obvious to the naked ear.
It's unfortunate that sometimes unwanted noises can end up in your audio file...
Especially during the early stages of learning to record at home!
As noise exists everywhere!
And can be captured or generated at any stage of the production process.
Simple things like your PC itself...
Heaters...air con units...etc...
All produce sound!
And noise is a troublesome issue for a home recording studio.
So your setup is important...
During the recording process, you should switch off whatever isn't essential and banish anything noisy as far away as possible!
Click here to learn how to soundproof your own home recording studio.
.
Having the microphone too close to the wall
.
The next possible oversight when first starting out in your home recording studio is having your microphone too close to the wall.
Positioning a microphone can be tricky in any home recording studio situation, particularly if your mic is omnidirectional.
Where to place your mic for vocal recordings varies according to your setup and the size and shape of your room.
The wall is a reflective surface so the closer you are to the wall the faster sound is going to come back to your microphone and interfere with your recording!
So try to stay away from the wall!
However, if you have no choice but to be near a wall...
You need to put some kind of absorbing material up on the wall closest to where your microphone is so that sound doesn't immediately bounce back into your microphone.
Check out this article for some effective soundproofing ideas for your room!
And it may also be wise to invest in a reflection filter for your mic to stop unwanted sounds from getting to it.
.
Having the microphone level up too high
.
Nowadays with everything being digital, you don't really need to record so loud.
Back in the analog days, people would overload their pre-amps because they enjoyed how it sounded!
But with digital audio recording, it doesn't sound good, it's just going to cause distortion on your song.
Most audio interfaces already come with built-in preamps, and 'gain' is the first control that the microphone signal goes through in a mixer.
As a rule of thumb, most producers record usually somewhere around negative 6 DB but it depends on your space and who or what you're recording.
If you turn the pre-amp gain up too high whilst recording it will clip, which looks like this:
.
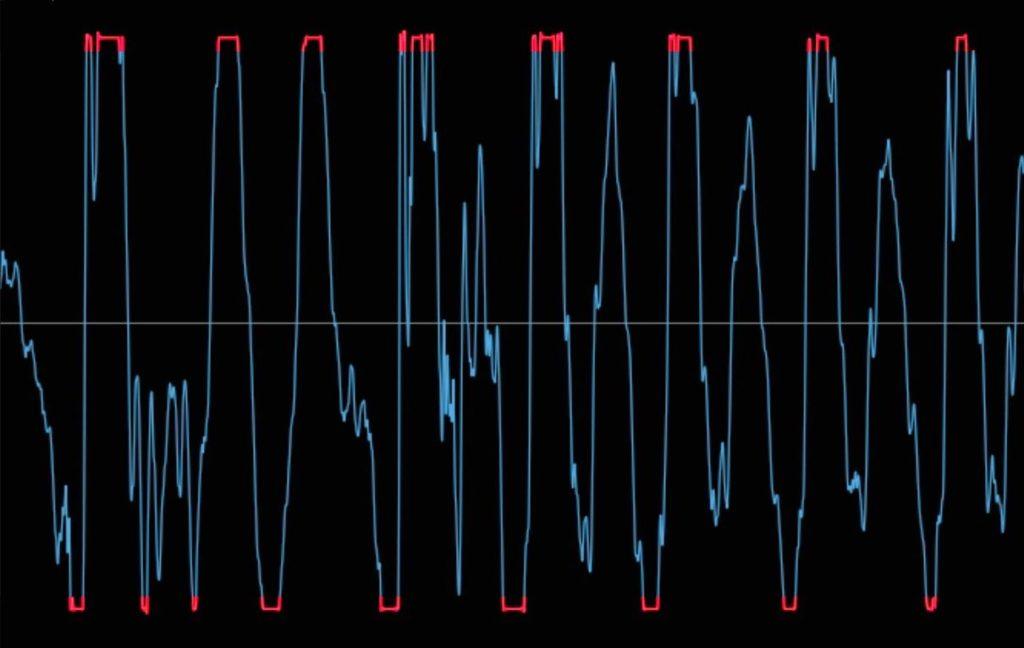
So gain is the volume of the input level of the microphone and you need to make sure that's set at the correct setting so your audio waves flow and there's no distortion.
Digital clipping sounds terrible! And should always be avoided!
.
Having the microphone level too low
.
Depending on what you’re recording, there are three variables;
.
- how loud the sound source is
- the microphone distance
- the microphone sensitivity
.
And the same way that having your mic level up too high can result in an imperfect recording, having the mic level too low can also cause problems later down the production road.
The trick is to improve the level of signal coming into the mic.
If the microphone preamplifier gains control is turned down way too low basically later once you start to add EQ, and compression, etc. and you need to turn that audio up you will hear everything on the noise floor increase too.
So just remember everything else the mic picked up will also get louder too.
To fully understand the ins and outs of gain control of a microphone preamplifier click here.
.
Being too close or singing into the wrong side of the microphone
.
The next mistake that you'll often hear pro producers complaining about when receiving home studio recordings to mix is that they just aren't clear enough.
This happens because the vocalist has either recorded too close to the mic or delivered their vocals at the wrong angle!
All microphones have a pickup pattern and not singing into the right side or being too close creates sound distortions that happen from overloading the mic from being excessive.
If you're not sure which way your mic should be facing or what side you should sing into, read the instructions manual.
As a vocalist, you may have to try out many techniques and learn how to position yourself correctly - practice singing or rapping into the mic to discover what works best.
The two biggest peeves are whenever a vocalist sings a “p” or “b” sound or any other sound from your mouth that has a quick expulsion of breath through the lips.
You will hear them being referred to as "P-Pops" or "plosives"!
Then there's also 'sibilance' which is excessive hissing when producing S’s and F’s sounds.
This can be minimized by using a pop filter screen so just get a pop filter to place 2-3 inches away from the microphone and reduce those plosives!
Or you can make one yourself with a clothes hanger and some tights!
Here's an article Microphone Setups – How To Find The Sweet Spot if you want to learn more about getting the perfect vocal recording from your home recording studio.
How close you should stand or how far you should be from the mic is up to you, it differs because it will depend on your space and what type of microphone you are using - click here to learn about all the different microphone types.
Quick Tip: To minimize the proximity effect you should be looking to place your microphone between 15 and 30 cm (6-12 inches) away from the sound source.
.
Not using nice-sounding vocals
.
Whilst we're on the subject of vocals and vocalists...if you suck at singing and you can't hit the notes you desire for your song perhaps it's best to find some else to do it for you.
You can ask around or hire someone who's vocally talented before you record it for others to listen to.
Don't put yourself on the song, just for the sake of it because it would be a huge shame and a pretty bad mistake if you are creative and can really make amazing music but then the vocals just kill it!
A good song that you've written but let someone who's better sing it has more chance of success.
You can record yourself prior to hitting the studio to give the person an idea of what you want?
If you have an okay voice then singing lessons and practice will help you learn to perform your songs better.
Either improve your own skill or get someone who's voice is their forte to do the vocals for you.
.
Recording mono sources onto a stereo track
.
If you plan on creating music from your own home recording studio something you need to wrap your head around is the concept of mono and stereo.
Many newbies when starting out in their home studio make the mistake of recording a mono source onto a stereo track.
Mono audio means recording onto one channel of audio; one recording with one microphone onto one channel.
If you have one microphone, one XLR cable, and you're using one input on your audio interface, you are recording in mono.
Stereo tracks need two input sources; both left AND right.
Nowadays most music is mixed in stereo, stereo is two channels of audio; left and right.
When we listen to music through our headphones or speakers we are hearing mono sound in a stereo environment.
Watch this video to understand it all a bit more to ensure you don't make the mistake of recording mono audio onto a stereo track:
...or you can read this: The Difference Between Mono and Stereo Sound which will teach you the the difference between mono and stereo audio files, playback, and recording.
.
Having the hardware buffer size turned up too high
.
Another mistake people make and it's definitely something to avoid...is having the hardware buffer size turned up too high.
Buffer size and latency can affect your recording in your digital audio workstation (DAW).
Buffer is to do with latency; as buffer size dictates how much latency that you will have when you are recording instruments and vocals.
.
What is latency?
Latency is basically the time that it takes for the audio signal (of whatever it is that you're recording) to travel from the microphone through your interface and then back out to the headphones or your monitor.
.
Generally, you might hear that the hardware buffer size should be set high for mixing and low for recording - the lower you go the less latency and the higher...the more latency!
So there's a time delay there - latency is the time difference between a sound being created and heard.
You want to have your hardware buffer set as low as you can possibly handle and many pros will recommend anywhere between 256 and lower.
The higher you go, the more latency so you'll get a form of an echoey, delay effect which is why you've got to ensure you've got the correct buffer size setting to avoid latency.
.
Over-Compression
.
Compression is the best way to control dynamics, not only does it bring control and keep some instruments in check it makes other elements of the mix tighter and more powerful.
Too much compression can make your tracks distort.
The two hallmarks of over-compressed vocals are sibilance and pumping.
If you're wondering whether you should EQ before or after compression generally, using EQ in front of your compressor produces a warmer, rounder tone, while using EQ after your compressor produces a cleaner, clearer sound - EQ is a massive subject for professional audio engineers.
Keep in mind that a little compression goes a long way.
The producer's handbook to mixing audio stories
.
Click here to check out 'The Animated Guide to Compression'
.
Of course, the only real way to get better at making music in your own home recording studio is just by jumping straight in and doing it because with time and practice comes knowledge and skill - it's inevitable that you will learn and improve.
It's definitely important that you get some professional mixing services on your song once you've finished but to avoid any embarrassment you want to get your production to a point that's semi-professional right?
If you follow the advice given above you can combat any of these problems should you encounter them.
At Indiy, we believe artists should have complete ownership of their creative content.
We are the online marketplace for musicians, the place to buy and sell your music services.
.
Get your music heard and build your audience with us, or head to our home page to take a look at some of the amazing services being offered to help you progress on your music career journey.
DO YOU MAKE MUSIC? THE INDIY MISSION
Indiy exists to help people create great music!
Did you know 40 thousand songs are uploaded to Spotify every day!
We want to hear about what you do, what makes you special and share it with the world!
Submit to be interviewed for Indiy Spotlight, its 100% FREE Just click here for your music interview
If you are working on new material, we have partnered with Audio Mastering to offer mastering on your next release from just £2 per song (approx $2.75 USD) - Check the offer out here
Search all articles

Andrea
Andrea graduated from Roehampton University and The BRIT School, whose globally recognized alumni include Adele, Katy B, Ella Eyre, FKA Twigs, Jessie J, Leona Lewis, Katie Melua, Kate Nash and the Rizzle Kicks. She takes her love of the arts and entertainment industry to provide useful information to upcoming musicians, helping them navigate the industry and avoid making costly mistakes. She actively mentors our current contributors. Andrea has qualifications in Content Marketing and also manages our collaborative playlists for independent artists
Follow Indiy